Sunday, October 9, 2011

Witch Craft

Candy Corn are to Halloween as Peeps are to Easter. Made of pure sugar, filled with nostalgia and used for everything but eating.1 (http://100waystokillapeep.blogspot.com/

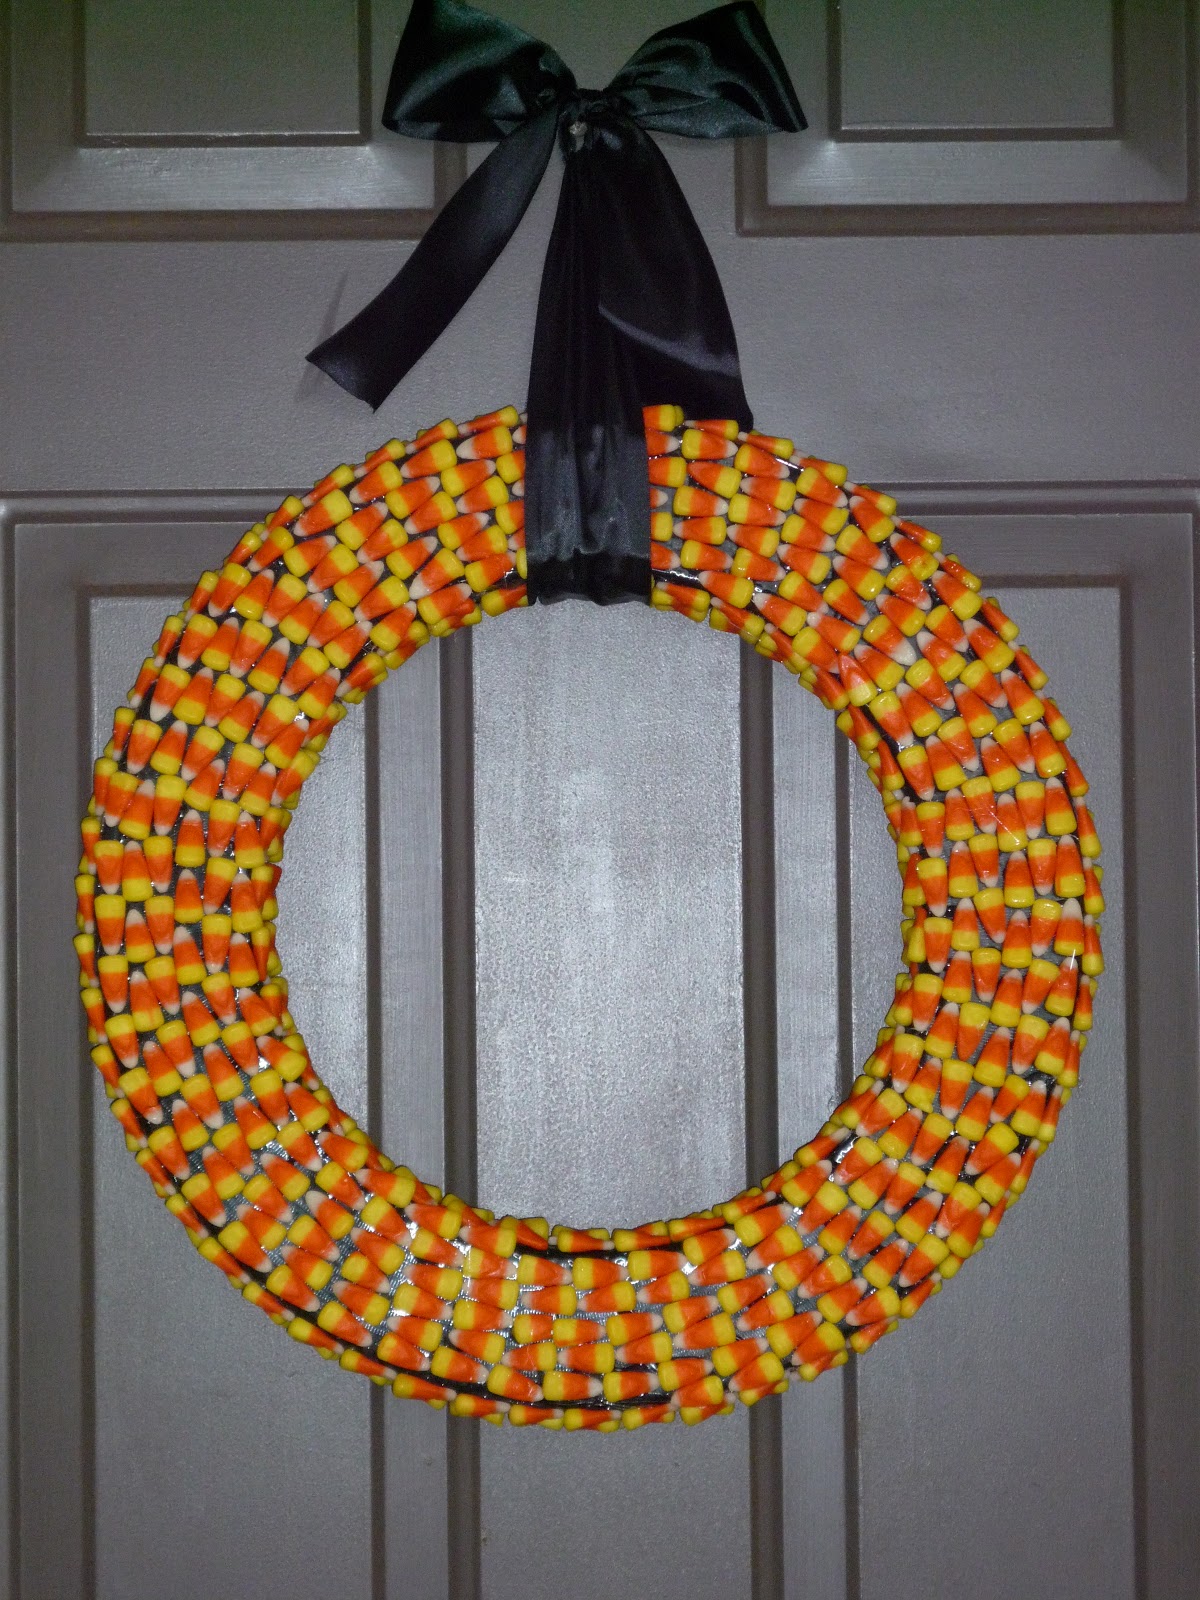
This weekend I decided to show my candy corn support by using them as the medium for my Halloween craft-- a super traditional/simple candy corn wreath.

What you will need:
3- 22oz bags of Candy Corn
Black duct tape
Hot glue gun 
Styrofoam wreath base (mine was 18")
Black ribbon
A dentist

Step 1: Wrap the styrofoam all the way around in black duct tape

Step 2: Glue the candy corn all over the wreath (it helps if you figure out a pattern in the beginning and follow it all the way around so you have a consistent look.)

Step 3: Tie the ribbon any way you'd like and hang!

Trick: Weed out all the "reject" corns before you start the gluing process. You'll be happy you did this when your glue is hot and drying fast and you're scrambling through the bowl for a damn corn that actually made it to the white-tip step in the factory.

Treat: Due to the sugar high, this craft should take you about...30 seconds. 


Boo-tiful! See mummy, I eat my veggies =).

xoxo,
elf
1. According to my bag of Brach's, each year American's consume enough candy corn that if laid end-to-end, would circle the earth 4.25 times...lies

Monday, October 3, 2011

Baby Nursery Craft for Dumbos

My friend Kristen is having a baby soon. I'm cool with it. To prove it, I decided to make her some wall decor for her baby girl's nursery--which is elephant themed. 

Step 1: Pick a nice matted frame (I found mine at Homegoods for $12 and chose espresso colored wood since her crib was a darker wood)

Step 2: Find mixed media prints like newspaper, craft paper, recycled greeting cards, wrapping paper, product packaging, etc. (I chose a lot of purple colors since it's this mommy's fav)

Step 3: Draw an elementary looking elephant on a scratch paper (this is for you to trace onto the mixed media so you can cut the individual pieces easily)

Step 4: Cut your elephant into five pieces; butt, head/trunk, ear, 2 water splashes

Step 4: Use craft glue to adhere the pieces together on a solid-color piece of craft paper and frame. Voila!


An easy tusk, that e'll cost you peanuts and she'll never forget! 

K, I'm done.

Pottery Barn Lamps

There are a few "mom" sayings that stick in my head from growing up.
1) Don't let the bed bugs bite (after the bed bug epidemic of 2010 I hope mom's used their best judgment, held some kind of conference and retired this one)
2) Money doesn't grow on trees. S#@* was she right.
3) Do you live in a barn? Whenever my mom said it, I stood their dumbfounded racking my brain to no avail for a smart ass response cause WTF does that even mean? Something about a door ajar I think, but no one can really be sure.

Now that I am a smart ass adult, I do have an answer MOM...Yes, I think I live in Pottery Barn. 

Horrendous segue. But it's true, I really like Pottery Barn and wish I could afford to furnish my home with everything they sell. But S#@* money doesn't grow on trees!

This very long post is the introduction to my first project as diy elf. I was in Pottery Barn and fell in love with their Glass Wine Jug Lamps which were $199 EACH. After the sticker shock, I was on my way out the door (which I left open) when a, eh, light bulb went off. YOU CAN MAKE THESE EASY ELF!

And mine:
(I am really going to need to get better at photography to continue this blog)
Lamp: Ikea $49.99; Rope: Home Depot $2.99
Savings: $146

Goodnight. Don't let the bed bugs bite. =)